
Showing posts with label SWG 101. Show all posts

Wednesday, August 5, 2009

SWG 101: Crafting Station Input Hopper


Crafting can be an overwhelming experience for new players. The number of resources and subcomponents is quite daunting. In time, crafters each devise their own methodology for organizing their resources in order to better streamline their crafting process to achieve the best results.

But even the most organized crafter sometimes finds her inventory overflowing with scores of resource stacks. During the assembly process, the crafter might be put to task to finding the correct stacks while ignoring those which are for grinding and/or for other schematics entirely.

That's where a crafting station input hopper comes into play.

Stand in front of your crafting station and bring up the radial menu. Select "Open Input Hopper" as shown below.
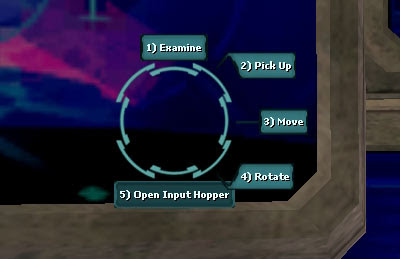

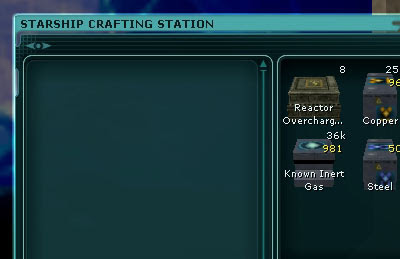
This command will open the Crafting Station. In the images, I am using a Starship Crafting Station. From your inventory, drag and drop the resources and subcomponents that you will need for the forthcoming assembly.

As you can see, I have dropped Reactor Overchargers, Copper, Gas, Radioactive (not pictured) and Steel. These materials are required to make Reactors.

Next, begin your assembly by opening up your crafting tool and selecting the item you wish to craft. Continuing my example, I have selected a Reactor.

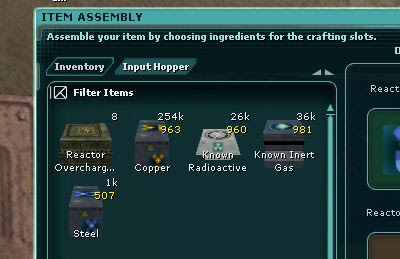
By default, the Item Assembly window takes you to your Inventory. This is where a crafter may be overwhelmed; so many choices and most of them wrong! No problem. Click the tab called "Inventory Hopper".

By doing so, you will see all (and only) the materials you placed within the hopper. The picture below depicts the Reactor Overchagers, Copper, Radioactive, Gas, and Steel that I dragged into the hopper earlier.
Continue assembly this type of item until you are finished. If you selected only the best (or what you desired), then you don't need to be extra careful when putting the resources into the schematic.

I think you'll find this easier then hunting around in a stuffed inventory window to look for precisely the right resources.

Saturday, April 11, 2009

SWG 101: Navigating the World Map


Did you ever have a need to travel to a different planet, but were unsure which starport you should dock with in order to be close to your final destination? For this edition of SWG 101, we will discuss how the world maps are designed and how you might best estimate what region of the world your destination lies.

Consider the following map; a region of Kashyyyk.


Now, imagine that the map is divided into four even parts in a 2x2 grid. This establishes the center point of the map. We'll call the vertical line the "Prime Meridian" and the horizontal line the "Equator".

At this intersection, the map coordinates are 0,0. This means if you entered in "/way 0, 0" you would create a waypoint at the center of the map that you are currently on.

When creating a waypoint, the first value is the x coordinate, which establishes the left-to-right location of the waypoint. The second value is the y coordinate, which establishes the up-to-down location of the waypoint.

  • Anything left of the Prime Meridian is considered a negative value for the x coordinate.
  • Anything below the Equator is considered a negative value for the y coordinate.
Thus, any waypoint that is both below the Equator and left of the Prime Merdian would have coordinates that are both negative. For example: /way -200, -500.

Conversely, if the waypoint is right of the Prime Meridian and above the Equator, the coordinates will both be positive.

The positive and negative numbers may also be mixed. For instance, you may know that Theed is located in the upper left region of Naboo's world map. That means that Theed has a negative x coordinate (left of the Prime Merdian) and a positive y coordinate (above the Equator).

Another city on Naboo is Moenia. The coordinates for the starport are 4708, -4693. From those coordinates, can you determine which part of the world Moenia is located?

Good luck and be sure to impress your groupmates by knowing exactly where to land every time!

Saturday, March 28, 2009

SWG 101: Placing a Vendor


If you are one of the crafter professions, you will gain access to placing a vendor to sell your wares. Once you qualify for placing a vendor (Level 7), follow these simple steps.
  1. Enter a structure that you own or have admin to
  2. Locate the structure terminal and bring up the radial menu
  3. Select "Create Vendor"
  4. You will be presented with a few screens where you choose the type, gender and name of the vendor.
  5. Once complete, the vendor will appear in your inventory. Hit "I" to bring up the inventory and find the vendor.
  6. Bring up the radial menu on the vendor and select "Examine". Check the vendor and ensure it has an appearance that you are happy with; you cannot change the appearance. If you do not like the appearance, you can delete the vendor and return to step 2.
  7. Stand in the location where you would like the vendor to work from.
  8. Bring up the radial menu and select "Drop Vendor"
  9. If you do not like the location you chose, target the vendor and type "/pickup". Return to step 7.
  10. Use the vendor's radial menu and select "Initialize..." to activate it.
  11. The vendor can no longer be moved from its spot, but you can rotate it around using /rotate yaw n, where n is a number of degrees to rotate the vendor.

Congratulation! You have placed a vendor. This concludes the basics, but you should not stop there. It is important that you pay maintenance on the vendor. There are other functions that allow the vendor to be customized to your tastes, but those are beyond the scope of this most basic guide.

Good luck on your new venture, and may the credits come quickly!

Sunday, March 8, 2009

SWG 101: Naming a Droid


For the first lesson in SWG 101, we're going to discuss the basics behind naming a droid.
  1. When you deploy a droid, bring up the radial menu. By default, you can do this by clicking on the droid and hitting the tilde key in the upper left of your keyboard.

  2. Look for the Program option and select it. This will bring up a window that contains all the possible droid actions, along with the default commands.

  3. Select an action. You will be prompted to say something in chat that will become the word or phrase that will be tied to the action. The next step describes this in further detail.

  4. In your chat box, enter the word or phrase you wish to use to get the droid to perform the action you selected in the previous step. Here is the important part: Precede this command with the name of the droid. For example: "Artoo follow" or "Goldenrod attack"

  5. Repeat steps 3 - 4 three more times. Each time, select a different command but use the EXACT same name preceding the command. After the fourth successful command learned, the droid will accept its name.

  6. If the droid does NOT accept its name, then the name is not valid for SWG. Choose another name and try again.

Extra Credit: Did you know that you can use the /tellpet command? For example, simply enter "/tellpet Artoo follow" to quietly give the orders to your droid. Only you and your pet will hear the command, so you don't end up spamming your groupmates.